DIY tip #1:
Do you get a TON of Christmas photo cards from friends and family? Every year we seem to get more and more and the older I get, the more precious they are to me. I never want to throw them out, but if I keep every single one of them, they will soon overtake my house!
Well, a couple of years ago I came up with an idea to preserve those pictures (and your pocketbook since we all paid for those cards), and create something the family can use during the Christmas season: Holiday Placemats.
There are several reasons why placemats are great.
 1. You compress all of those cards each year into ONE single mat, instead of having loose cards laying in a box or shelf and collecting dust.
2. Kids LOVE placemats! You can keep them occupied while making dinner by having them name off everyone they know, or find how many are wearing red, or who has brown hair, etc.
3. Adults enjoy seeing how much everyone has changed throughout the years, especially the children.
Want to make your own? It's very simple!
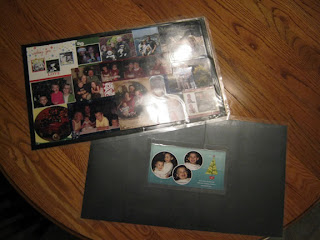
First you arrange the cards into a collage. It may take a little while to arrange them to fit the way you want, especially if you're a perfectionist like me. You can make any size and shape. I chose to do a rectangle since it was the easiest.
Next I gently taped them together on the backside to hold them in place.
Then I bought some 12x12 scrapbook paper to glue to the back of the pictures, leaving a 1/4 inch border around the sides of the mat. I chose a simple black paper for all of my placemats, only because I could see my kids fighting over which mat they wanted if I did different patterns.
To seal and protect your collage, you will need to laminate it. You CANNOT use a hot laminate on these since they're photographs and melting might occur. I went to Office Depot and bought a large roll of cold laminate (about $10). I then cut it to size, leaving some overlapping on the sides, then peeled the backing off, laid it on one side of the placemat starting from the center and rubbed it out to the edges. You will need a debit card or something to rub out as many bubbles as you can. When you complete one side, flip over and do the other side. Then trim the edges to give it a polished look.
NOTE: You WILL have bubbles and it won't be "perfect", so don't be discouraged.
Don't forget to add your own photo card to the collage. I actually forgot (oops) and ended up putting it on the back of the mats, which works great too!
It's never too late to start these. If you get a lot, you can make a couple/year, especially if you have a big family!


